To Issue 136
Citation: Rudolph T, Reil M, Schumann S, Weigert T, “Industrialisation of Pharmaceutical and Medical Devices in the Scientific Moulding Approach”. ONdrugDelivery, Issue 136 (Aug 2022), pp 28–33.
Thomas Rudolph, Markus Reil, Stefan Schumann and Tobias Weigert discuss Gerresheimer’s strategy for managing potential risks across the entire product lifecycle, including the identification of all parameters within the injection moulding process using highly precise measurement technology.

Figure 1: Quality by design flowchart.
There are very few other industrial sectors where reliable quality plays such a crucial role as in the drug delivery device sector. Every faulty product can put the efficacy of a therapy and, in extreme cases, the life and health of the patient at risk. With this in mind, Gerresheimer made a paradigm shift years ago (Figure 1). The goal of the company’s quality strategy is no longer to weed out faulty products at the end of the production process (quality by inspection) but instead to design the entire product lifecycle around preventing faulty products in the first place (quality by design). In so doing, Gerresheimer reduces the risk of rejected batches, ensures interruption-free product delivery for its customers and benefits patients, who can rely on flawless primary packaging and reliably functioning devices.
RISK-BASED APPROACH
A deciding factor for successful quality by design is to recognise all the relevant risks in the product lifecycle, classify them according to their severity and develop appropriate strategies for mastering them. By identifying, rating and prioritising these risks, Gerresheimer lays a reliable foundation for all stages of the product engineering process. This approach can be split into three pillars:
- Risk management, in the form of targeted, prioritised management of risks performed as a continuous task
- Control strategy in production, which ensures that the quality levels corresponding to the risks are met in series production over the long term
- Validation strategy, which acts as the link between the other two pillars, accounting for the fact that long-term data from series production are, statistically, always worse than the short-term data from the validation phase.
By taking a risk-based quality approach, producer and consumer risk can be clearly limited. The customer’s requirements for the product are translated into key figures, which enable precise measurement of the required properties. During the product engineering phase, a strict validation strategy is defined based on the severity of the product risks determined in the linked failure modes and effects analyses and the acceptable business risks. In turn, the control strategy during production is determined by product risks and residual risks. The outcome is a production process where the customer can rely on product properties and quality without reservation.
Gx INNOSAFE – INTEGRATED PASSIVE SAFETY SYSTEM FOR PREVENTING NEEDLESTICK INJURIES
With their exposed cannulas, used syringes present an omnipresent source of danger in medical practices, laboratories and hospitals. Existing needle protection systems reduce the risk of injury for end users but require additional effort both during filling and when using the syringe. With Gx InnoSafe (Figure 2), Gerresheimer offers a syringe with an integrated passive safety system that is optimised for processes at pharmaceutical companies, preventing accidental needlestick injuries and reuse.
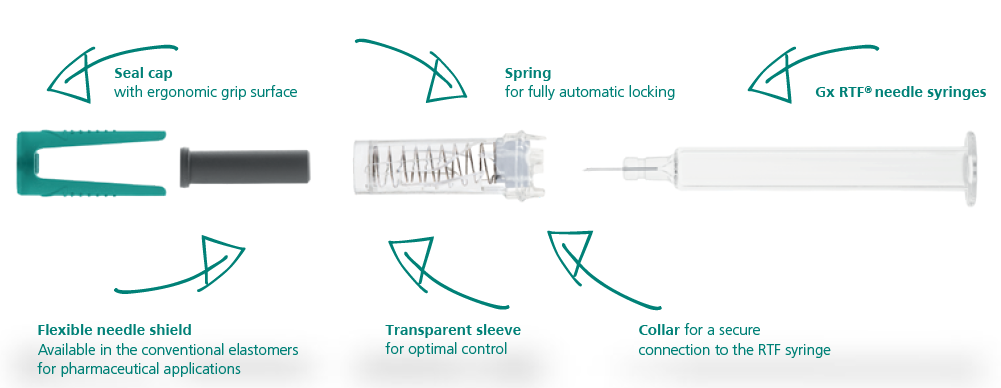
Figure 2: Gerresheimer’s Gx InnoSafe safety system.
“Due to the impossibility of inline testing, quality assurance for the sealing mechanism must take place via statistically analysed samples.”
For users, injections are performed as usual. The syringe body is visible so users can check that it is filled and that the contents are pure, as well as optimally monitoring administration. After removal of the sealing cap with an integrated flexible needle shield, the syringe is placed at the site of injection, the cannula inserted into the tissue and the active agent injected. Accidental triggering of the safety system is ruled out as the mechanism is not activated until the cannula is inserted, and the safety mechanism is automatically and permanently locked once the syringe is removed from the site of injection. In this way, the cannula is reliably concealed and syringe reuse is prevented.
For the pharmaceutical company, the Gx InnoSafe offers all the benefits of the ready-to-fill (RTF) syringe filling process. During production, the safety system is assembled on Gx RTF glass syringes in the cleanroom just as with a standard needle shield. The syringes are packed with the safety system in a 100-hole nest and tub format, then sealed and sterilised with ethylene oxide. They can be processed on existing filling lines without additional preparation and assembly steps.
MEASUREMENT TECHNOLOGY KEY COMPETENCE FOR THE SCIENTIFIC MOULDING APPROACH
Gx InnoSafe was developed to prevent needlestick injuries, which is one of the greatest residual risks for syringe-based injections. A quality level adequate for the risk plays a decisive role when it comes to success in clinical practice. However, this is anything but trivial when it comes to mass production of a product. While the whole range of quality criteria can be fully checked inline during production, this does not include the most critical function of Gx InnoSafe – the irreversible sealing of the needle.
Due to the impossibility of inline testing, quality assurance for the sealing mechanism must take place via statistically analysed samples. For the product, maximum reliable (worst-case) error rates were defined for series production based on the risk management severity. The testing strategy for series production was then determined based on the required sample sizes and acceptance criteria. For validation, the sample sizes and acceptance criteria were tightened, based on internal quality processes, to ensure that a quality level corresponding to the application risks is reached over the long term. Risk-based product reliability values exceeding 99% and a statistical confidence level of 95% were applied.
To achieve reproducible measurement results during function tests, measurement methods were developed and optimised for use in series production, then qualified in Gerresheimer’s metrology and quality lab. The test and functional parameters defined by quality engineering in the component requirement specification (CRS) have to be measurable using jigs on co-ordinate-measuring equipment. Gerresheimer relies on Zeiss Contura G2 and Zeiss O-Inspect CMMs (Carl Zeiss, Oberkochen, Germany) as standard for tactile and optical measurements to ensure department and location-independent reproducibility.
In parallel with mould making, a measurement strategy is developed and co-ordinated with the customer or quality engineering. As a result, a measuring device can be derived, which is available for measuring the first test samples in Gerresheimer’s Technical Competence Center in Wackersdorf. The creation of the test programs takes place virtually, in parallel, to ensure that the defined standard probes can be used. (Figure 3).
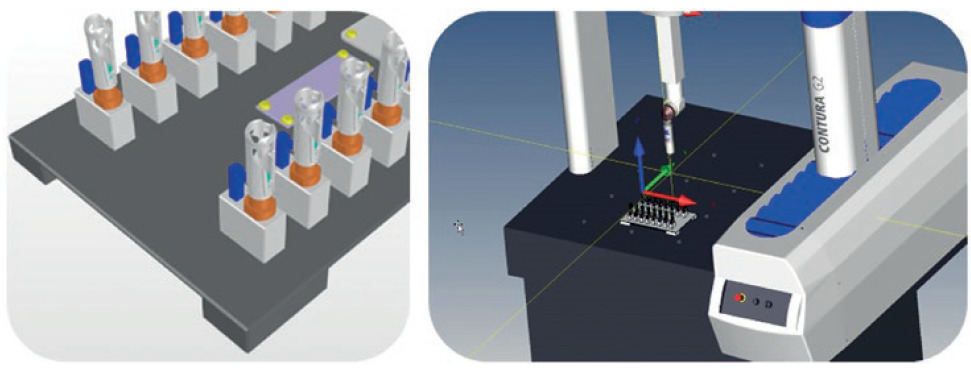
Figure 3: Virtual test programs are created in parallel for qualifying standard probes.
“The goal is to analyse the whole injection moulding process, from the time the resin enters the injection moulding machine to when it leaves the mould as a finished part, with the ultimate aim of establishing a process that minimises variation in part quality.”
SCIENTIFIC MOULDING APPROACH
Quite a number of process variables define an injection moulding process and must be considered when establishing a robust process for achieving consistent part quality. Application of a scientific moulding approach helps in understanding the characteristics of each parameter and its influence on a specific part. The goal is to analyse the whole injection moulding process, from the time the resin enters the injection moulding machine to when it leaves the mould as a finished part, with the ultimate aim of establishing a process that minimises variation in part quality.
During the first step, the back pressure, suck back, cavity balance, injection rate via viscosity curve, holding time, switch over point, clamping force and cooling time parameters are analysed. Whenever it is possible, in-cavity pressure sensors are used to optimise the process.
This is followed by a parameter screening to determine an aesthetic process window within which visually acceptable parts can be produced. As standard procedure, the four parameters of melt temperature, mould temperature, injection speed and holding pressure are varied. This provides information about the performance and limitations of the mould, as the chosen variables are stretched to their limits to determine the inherent limits of the mould. The wider the limits are, the bigger the process window is and the more robust is the process. As the screening provides a window for visual appearance of the part, dimensional data must be taken afterwards.
Once the process parameter limits have been determined, a fraction factorial design of experiments (DoE) is performed to investigate main effects and parameter interactions on the most critical and functional dimensions, as defined in the CRS. DoE can be performed on serial machines or pilot plant injection moulding machines of various types and sizes, as well as from different manufacturers.
After the measuring jig has been produced and delivered by the in-house tool shop, it is then qualified with the test program. This means that a defined and co-ordinated qualification plan is used to ensure that production has taken place according to specifications. It also includes the successful completion of two measurement system analyses (MSAs). A CG value of >1.33 applies as the acceptance criterion for MSA 1 along with a gage R&R value of <20% for MSA 2 (Figure 4). This ensures that identical measurements are generated across all fixture positions and that the operator influence is kept to a minimum.
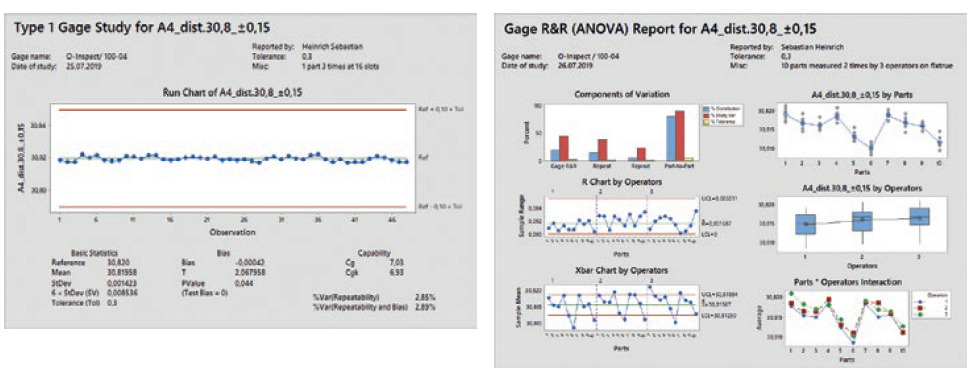
Figure 4: Two MSAs are conducted as part of tool qualification.
“The use of CT scans to fully measure plastic components is a key point and serves as a means of creating initial sample test reports at high speed and at a consistently high quality.”
After completing all qualification sections, the system is approved for tool qualification and can be used for all further measurements, including DoE, measurement report and process capability. As soon as the tool qualification is completed, the equipment is sent to the respective production site and used for in-process control.
Statistical analysis of the dimensional results of the DoE is then used to filter out the significant parameters for the considered dimensions and gives a deeper understanding of how the part behaviour depends on several parameter combinations (Figure 5). Based on the results of this analysis, either the mould steel will be adjusted to move dimensions to the centre of the process window or a parameter setting is chosen that already gives the best results regarding robustness.

Figure 5: Interaction between process parameters.
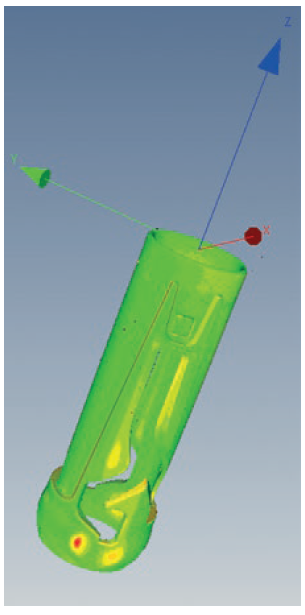
Figure 6: X-ray data is used to show the difference between the measurements taken by different tools and deviations from the CAD model.
Once the DoE analysis has revealed which combinations of parameters should be selected for a given tool, the components are measured according to the drawing. In addition, virtually all other dimensions defined on the drawing are measured using an X-ray scanner. At Gerresheimer, this is done on a Zeiss Metrotom 800, which scans and identifies the components based on a barcode as part of a fully automated process. Additionally, comprehensive test programs, which are programmed at the start of mould making, autonomously measure all the plastic components for each mould cavity. As a result, digital product data and measurement reports are available.
The use of computerised tomography (CT) scans to fully measure plastic components is a key point and serves as a means of creating initial sample test reports at high speed and at a consistently high quality. This is due to the fact that components can be measured without any possible warpage during clamping and in sequence (“one-shot measurement”). Gerresheimer also takes advantage of this when using jigs to measure test and functional dimensions.
A comparison ensures that the measurement results from the X-ray scanner are comparable those of the jigs. The X-ray scanner makes it possible to show deviations from the compute raided design (CAD) model or between the results of different tools in false colours (Figure 6). The digitisation of the produced parts enables reverse engineering by comparing the component with the CAD model or 2D design drawings. Unlike with physical products, digitised products are not subjected to environmental factors or post-shrinkage. For example, this allows changes to the components since tool creation to be tracked precisely. Function or defect analyses of components and assemblies are made significantly easier by using CT scans.
In the course of industrialisation, the moulds go through optimisation loops and finally pass several qualification runs on the serial machine. When necessary, the process can be adapted through additional DoEs. Alternatively, adjustments can be made based on the in-cavity pressure curve in the mould evaluated on the pilot plant IMM as it contains all the necessary information on the flow of the molten plastic and solidification phases in the mould. Matching that fingerprint delivers parts with the same and consistent quality, as well as being machine independent.
Qualification runs on the serial machine are performed at low and high levels based on the nominal process setting. With these runs, the natural variation of the key process parameters can be considered, allowing for a following analysis to confirm the process capability of the critical dimensions at the chosen limits. To perform a preliminary process capability analysis, at least 25 components of each cavity have to be measured. The Ppk value required by the customer serves as the acceptance criterion. A typical value for this kind of standard distribution with a confidence interval of ±3s is 1.67. This means that the probability that components meeting the quality requirements are produced is 99.73% (Figure 7).
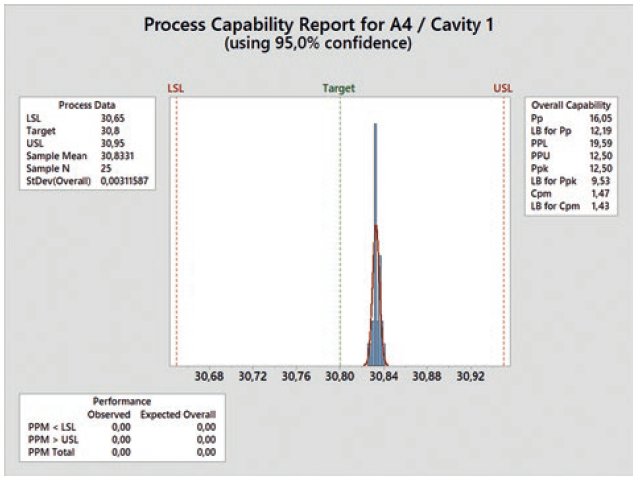
Figure 7: Process capability report.
Besides the lab for dimensional measurement of components, assemblies and finishe pdroducts, Gerresheimer also has a lab for function testing. It is equipped with a 4K digital microscope, a high-speed camera, a test station for metering accuracy, a 3D printer for rapid prototyping and three material test machines from ZwickRoell, a six-axle robot and two climatic test chambers.
CONCLUSION
At Gerresheimer, quality is no longer ensured by sorting out faulty parts after production but is instead established systematically in the products and processes during the development and industrialisation phases. During all phases of product engineering, the quality assurance department works closely with all the other departments involved. In this way, quality by design is not only the safest but also the most efficient way to launch medical products on the market.
Previous article
INTERVIEW: RENAN JOEL, CONNECT IN PHARMA CONFERENCENext article
FROM SIMULATION TO SPRING SATISFACTION
