To Issue 127
Citation: Parker S, Coulman S, Birchall J, Ecenarro S, Farag M, “Characterising the Wall Thickness of Quali-V®-I Capsules and its Effect on Capsule Puncture by a DPI Pin”. ONdrugDelivery, Issue 127 (Nov 2021), pp 54–58.
Siamac Parker, Sion Coulman, Prof James Birchall alongside Susana Ecenarro and Mahmoud Farag, present a study that uses optical coherence tomography to characterise the wall thickness of capsules at the dome position and investigates the importance of controlling the dome thickness of hard-shell capsules to be used in a dry powder inhaler.
“Whilst capsule moisture content is an established determinant of capsule puncture performance, the impact of capsule wall thickness on puncture has not been characterised.”
Hard shell capsules are commonly used in dry powder inhalers (DPIs) as reservoirs for the API formulation prior to inhalation. Powder inhalation occurs in two principal stages: actuation of the DPI to facilitate a physical insult to the capsule wall and inspiration to aerosolise the capsule contents. One of the most common mechanisms used to perforate the capsule prior to inspiration is by having two stainless steel pins simultaneously puncture the dome regions of the cap and body of the capsule. A robust methodology has been developed to help characterise capsule puncture1 and subsequently used to understand how temperature, humidity and capsule formulation influence the capsule puncturing event.2
Qualicaps’ Quali-V®-I capsule, a hydroxypropyl methylcellulose (HPMC) formulation with a moisture content of 4.5–6.5% w/w, has been designed and optimised for use in DPIs, with puncture tests demonstrating a robust and reproducible puncture performance following storage at a range of relative humidities. Furthermore, the development of this capsule stimulated development of an extra low moisture content capsule formulation, Quali-V®-I Extra Dry (moisture content 2.0–3.5% w/w). However, whilst capsule moisture content is an established determinant of capsule puncture performance, the impact of capsule wall thickness on puncture has not been characterised.
Deviations in the capsule drying process or film thickness during manufacture can impact the thickness and uniformity of the capsule wall, which poses a risk of creating physical defects during handling and transport or a change in capsule puncture performance within a DPI. As such, it is prudent to isolate a sample of capsules from each batch and determine the wall thickness (at the dome position) of each to ensure that they meet a minimum specification of 100 μm – a process that requires the use of a laborious manual measurement technique. However, the relative importance of this arbitrary value on the puncture performance of a DPI capsule is unknown.
To gain insight into this subject, a study was conducted to understand more about the relationship between capsule wall thickness and puncture performance in a DPI. The study also investigated whether optical coherence tomography (OCT) can viably be used as part of a rapid high-throughput in-line quality control method to characterise capsule wall thickness.
EXPERIMENTAL METHODS
Empty Quali-V®-I Size 3 hard-shell capsule caps were manufactured and supplied by Qualicaps Europe and categorised into three groups by their capsule wall thickness at the dome position, measured using a Mitutoyo (Kawasaki, Japan) Absolute Digimatic Indicator ID-C125XB micrometer:
- <100 μm
- 100–110 μm
- >110 μm.
These measurements are an established element of capsule quality control. Following categorisation, capsules were stored in resealable plastic bags at ambient conditions (relative humidity 54–60%) for one week.
To perform a puncture test,1 10 caps were removed from the bags and manually combined with 10 Quali-V®-I capsule bodies, ensuring that the cap and body were in the locked position. The complete capsules were then placed immediately in a weigh boat and allowed to equilibrate at ambient conditions for 15 minutes before starting the puncture test. The ambient room temperature and relative humidity were recorded immediately prior to the 15-minute ambient conditioning period and immediately after the puncture testing was completed.
“Whilst there was a statistically significant difference (P < 0.0001) in the force required to puncture capsules with a dome end thickness >110 μm, the shape of the force displacement curves was comparable for the three categories of capsules.”
The puncture test used a bespoke materials testing machine from ZwickRoell with an XForce P 500 N load cell. A collet chuck containing an angular metal pin from an RS01 2-pin inhaler (Plastiape, Osnago, Italy, part of Berry) was mounted on the load cell, and a stainless-steel bush (Qualicaps) from a capsule filling machine was used to secure the Size 3 capsules in a fixed position, below the angular metal pin. The materials testing machine was then programmed, using testXpert II software (ZwickRoell), to conduct a compression test at a speed of 10 mm/min, with the test programmed to end upon 3.5 mm of displacement into the capsule dome. Force-displacement profiles were captured following contact (0.1 N registered force) between the angular pin and the capsule.
Following the puncture tests, the punctured capsules were removed from the bush for visual inspection. Each of the three capsule categories were puncture tested (N=10 for each capsule type) within a 15-minute testing period. Following puncture tests, the capsules were removed from the temperature-controlled room and imaged within 2 hours using a Carl Zeiss (Oberkochen, Germany) stereo microscope. Differences between the maximum recorded force (the puncture force) for each of the capsule types were statistically compared using GraphPad Prism 9 (GraphPad Software, San Diego, CA, US).
Capsules were also imaged using OCT, which provided a rapid inspection method to confirm the correct categorisation of the capsules and to check the capsule wall integrity prior to puncture testing. OCT is a non-destructive high-resolution imaging technique that has been conventionally used to characterise anatomical features of the eye and skin,3 but which has been proposed as a potentially valuable tool to characterise sub-surface capsule features and their dimensions in the x, y and z planes.4,5
For OCT analysis, the caps were removed from the capsule body and positioned in a pre-determined location on an imaging stage. A Michelson Diagnostics (Maidstone, UK) VivoSight OCT instrument with associated probe was then used to perform a 4 mm scan of the capsule surface at 120 frames per scan using VivoSight Software Version 4.8. Each OCT scan produced a series of cross sections of the scanned capsule collected into a single data set, each of which was then imported into Fiji imaging software (based on ImageJ) and analysed to isolate the image that corresponded to the transverse cross section taken at the apex of the capsule dome.
For measurement, the pixel dimensions (4.5 μm by 4.5 μm) were calculated based on the known dimensions of the transverse image captured by the calibrated OCT system. The interior and exterior surfaces of the capsule wall at the apex of the capsule dome were then identified on the OCT image as discernible white lines, typically 3–5 pixels wide (Figure 1). The thickness of the capsule wall was then measured by drawing a perpendicular line from the base of the white pixelated line on the exterior surface to the top of the white pixelated line on the interior surface. Ten capsules from each of the three capsule categories under investigation were imaged under the same conditions, and the data were subsequently analysed using GraphPad Prism 9.
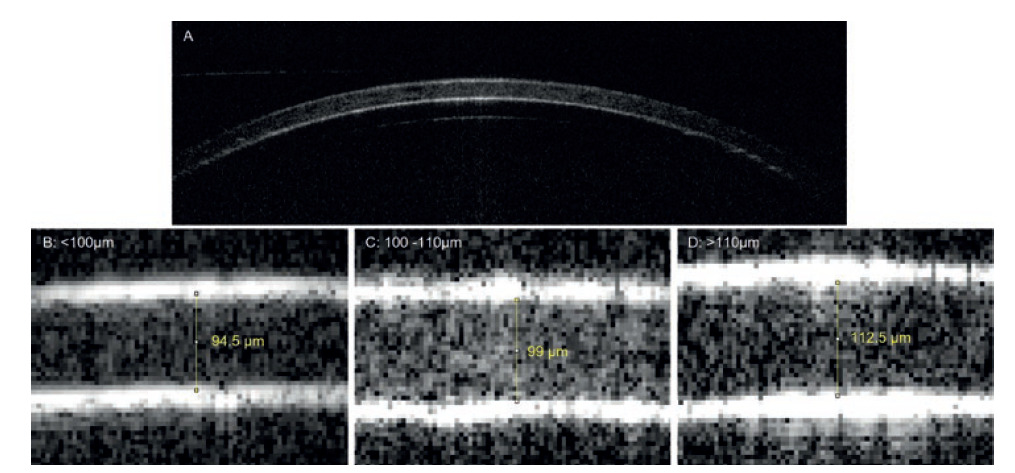
Figure 1: A representative transverse OCT image (section) of a Quali-V®-I capsule, taken at the apex of the dome at low magnification (A). High magnification images of the capsule walls of the three categories of Quali-V®-I capsule provide quantitative evidence of the three categories of capsule thickness used in this study, measured as (B) <100 μm, (C) 100–110 μm and (D) >110 μm using a micrometer. Images B–D are at the same magnification, and measurement of the dome thickness is exemplified by the yellow line.
RESULTS
Capsules were conditioned and tested at an ambient temperature of 19°C and a relative humidity of 54–56%. Using OCT imaging it was possible to demonstrate a quantitative, and statistically significant, difference in capsule wall thicknesses that roughly corresponded to the categories assigned by the manual micrometer measurements (Figure 2):
- <100 μm: 87 μm (± 4.8)
- 100–110 μm: 99 μm (± 8.8)
- >110 μm: 113 μm (± 11.4).
The mean force required to puncture capsules was 1.57 N (±0.11), 1.68 N (±0.12) and 1.99 N (±0.15) for capsules with dome thicknesses of <100 μm, 100–110 μm and >110 μm respectively (Figure 3).
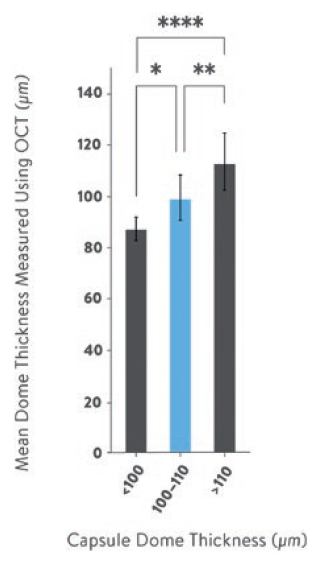
Figure 2: OCT measurements of the mean thickness of the wall at the apex of Quali-V®-I capsule domes for capsules previously categorised as <100 μm, 100–110 μm and >110 μm using a micrometre. Statistics used one-way ANOVA with Tukey’s multiple comparisons between means. Error bars illustrate the standard deviations. * denotes p=0.014, ** denotes p=0.0034 and **** denotes p<0.0001.
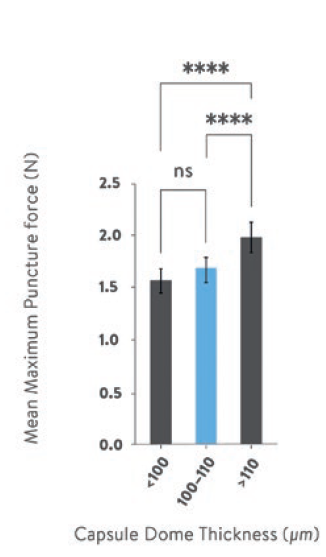


Figure 3: The mean force required to puncture <100 μm, 100–110 μm and >110 μm Quali-V®-I capsules with an angular DPI pin from a Plastiape RS01 2-pin inhaler. Statistics used one-way ANOVA with Tukey’s multiple comparisons between means. Error bars illustrate the standard deviations. ns denotes p>0.05, **** denotes p<0.0001.
Whilst there was a statistically significant difference (P < 0.0001) in the force required to puncture capsules with a dome end thickness >110 μm, the shape of the force displacement curves was comparable for the three categories of capsules (Figure 4).
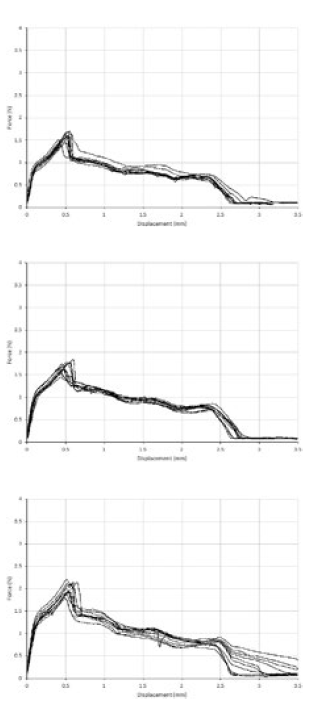

Figure 4: The force displacement curve produced for (A) <100 μm, (B) 100-110 μm and (C) >110 μm capsules.
There was also no significant cracking or fragmentation during or after the puncturing event, and the shape of the puncture was highly reproducible both within and between the capsules tested, with the “flap” remaining attached in all cases (Figure 5).


Figure 5: Representative images of (A) <100 μm, (B) 100–110 μm and (C) >110 μm caps following puncture with an angular DPI pin from a Plastiape RS01 2-pin inhaler.
DISCUSSION
Three different HPMC (Quali-V®-I) capsule products were manufactured, with intentional differences in the thicknesses of the capsule wall at the dome position. These capsules were categorised, by an established quality control method, as possessing a dome wall thickness of <100 μm, 100–110 μm and >110 μm. OCT imaging was used to confirm these categorisations and was evaluated as a potential rapid, non-destructive and high throughput means to measure capsule wall thickness, with the added benefit of providing additional information on capsule morphology and integrity. The measurements made by the micrometer and OCT were generally in agreement.
The minor deviation in the second category, 100–110 μm by micrometer measurement compared with 99 μm (± 8.8) by OCT, is to be expected, as the two methods of measurement use different fundamental principles of operation and OCT image analysis has not yet been optimised or automated for this task – the measurement was drawn by eye from the white pixels at the internal edges of the interior and exterior surfaces of the capsule wall. Measuring the distance between the midpoint of the two pixelated bands may rectify the minor difference in the two measurement methods. Therefore, whilst this study exemplifies the potential of OCT as a useful quality control tool in the capsule manufacturing industry, future studies are needed to provide validation, calibration against a recognised standard and optimisation for capsule analysis.
It is also important to acknowledge that the OCT imaging method, which is governed by the refractive index of an object, may not be ubiquitously applied to all capsule formulations. Intense backscattering from a more opaque material, such as a capsule formulation containing titanium dioxide, would likely prevent OCT image capture. However, for transparent capsule formulations, an automated non-destructive OCT imaging system for in-line quality assurance of capsule morphology is a real possibility.
OCT corroboration of the successful manufacture of Quali-V®-I capsules with three different capsule wall thicknesses facilitated investigation into how capsule wall thickness impacts on the force required to puncture capsules. As might be predicted, there was a direct relationship between these two variables, with a greater force needed to puncture the thickest capsule walls (>110 μm). However, the difference in force required to puncture those capsules categorised as <100 μm and those >110 μm were less than 0.5 N. This is unlikely to be practically or clinically significant – it would not affect the ability of a patient to manually actuate a DPI and puncture the capsule.
The different capsule thicknesses also had no effect on the dimensions of the puncture orifice or the physical integrity of the capsule following puncture, meaning that capsule thickness is unlikely to impact on the inhaled dose. Transport and handling would also likely be unaffected by a reduced capsule wall thickness, as exemplified by oral HPMC capsule products, which already have a lower capsule wall thickness specification than their DPI counterparts. The data therefore indicate that the mechanical properties of HPMC capsules allow for the specification of wall thickness to be adjusted to suit the needs of the specific manufacturer or product. Capsule specifications could also potentially be modified to include a wider range of dome thickness values, potentially reducing the waste associated with out-of-specification samples, although further work would be required to determine the upper and lower limits of the dome thickness and to demonstrate that changes in capsule thickness do not affect the inhaled dose.
REFERENCES
- Torrisi BM et al, “The Development of a Sensitive Methodology to Characterise Hard Shell Capsule Puncture by Dry Powder Inhaler Pins”. Int J Pharm, 2013, Vol 456(2), pp 545–552.
- Chong RHE et al, “Evaluating the Sensitivity, Reproducibility and Flexibility of a Method to Test Hard Shell Capsules Intended for Use in Dry Powder Inhalers”. Int J Pharm, 2016, Vol 500(1–2), pp 316–325.
- Fercher AF et al, “Optical Coherence Tomography – Principles and Applications”. Rep Prog Phys, 2003, Vol 66(2), pp 239–303.
- Jones BE et al, “Imaging Techniques for DPI Capsules”. Inhalation, April 2017, pp 14–19.
- Faulhammer E et al, “Multi-Methodological Investigation of the Variability of the Microstructure of HPMC Hard Capsules”. Int J Pharm, 2016, Vol 511(2), pp 840–854.


